I’m going to write out specific instructions for adding images to your sidebar for each of the three major platforms- WP.com, WP.org, and Blogger.
WP.COM
It’s important to realize that if you have WP.com, you do NOT have the option to add extra widgets. Sometimes different themes come with slightly different widgets, but most of you should have a widget called, IMAGE.
Click and drag it over into your sidebar.
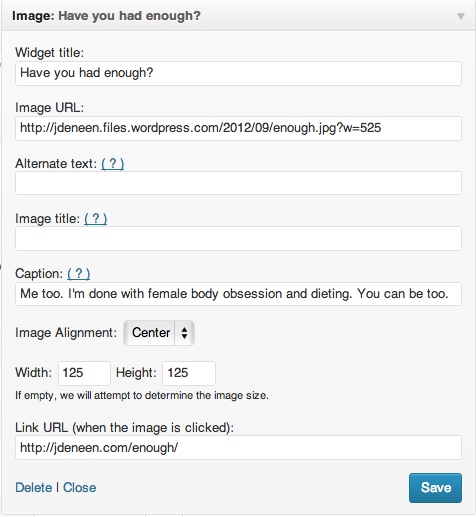
1. Widget Title: This is what appears above your image.
2. Image URL: This is where you insert the URL of the image. I know what you’re thinking- “But what if the image is on my hard drive?” If it is, you’ll need to upload it somewhere first; Facebook, Flickr, Photobucket, or your media library etc. Once it’s uploaded, you right click on the image and hit COPY IMAGE URL.
3. Alternate text is to be used in case the image cannot be displayed.
4. Image title appears when the mouse hovers over the image.
5. Caption: Appears beneath the image.
6. Alignment: Changes how it appears in the sidebar.
7. Width and Height: Leave it blank and the computer will figure out the size. If it isn’t right, adjust the width manually but leave the height blank (so it shows up in proportion).
8. Link URL: This is where you put the address of the site you want it to take the reader when they click the image.
Then hit save!
WP.ORG
Every theme will be a bit different. Some may come with a theme and others may not. Here is a custom widget image plugin you can download and install. Simple Image Widget
1. Download the widget.
2. Go to plugins and then add new.
3. Click on the word UPLOAD.
4. Browse for the file and then click UPLOAD.
5. When it is done, click ACTIVATE.
6. Now go to your widgets area and you should see an image widget.
7. Click and drag it over to the sidebar.
The title is…well the title!
For this widget, you must have the image file on your computer. Upload it.
You can then add a caption.
There is also the ability to change sizes and alignment.
The LINK field is where you put the URL for the destination after the click.
There is also the option for a new window to open when the image is clicked.
Hit save!
*You may have another image widget already in your theme called IMAGE (JETPACK). It looks and functions exactly like the WP.com directions. Follow those and you should be all set!*
BLOGGER
1. First go to your layout menu.
2. Then click ADD GADGET.
3. Choose the picture gadget.
The title is where you put the name of the image.
The caption goes below the image.
The link URL is the address you put so that the image is linked to a specific web page.
Then you have the option to either upload an image from your computer, or simply copy the image URL.
Then click save!
CODE
These are the simplest ways to add images although you can use text HTML widgets IF you have the proper code. In order to use an image, here is the code you must paste:
<a href=”Insert your LINK URL here”><img src=”Insert the IMAGE URL here” border=””0””></a>